STEP 1
Clarify roles and responsibilities
It’s important to include your entire team in your cleaning and disinfecting protocol program so that they are actively involved and accountable.
- Define everyone’s role and what parts of the program they are responsible for cleaning and disinfecting.
- Determine who is responsible for cleaning and disinfecting each surface and piece of equipment in all patient rooms, treatment areas, surgical suites, and public areas, including the lobby and restrooms.
- Develop a schedule for cleaning and disinfecting frequency.
| Front office staff | Lobby and other public areas |
| Veterinary or kennel assistant | Hospitalization and boarding areas |
| Veterinary technician | Exam rooms, treatment area, surgical suite, diagnostic equipment |
| Office or practice manager | Offices and administrative areas |
| Groomer | Grooming and bathing areas |
| Veterinarians | Personal equipment, such as stethoscope |
STEP 2
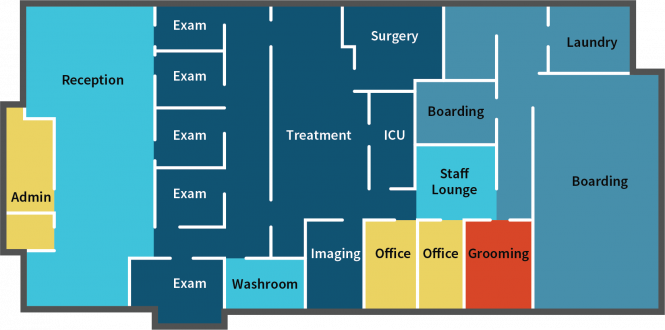
Identify levels of biosecurity risk
Different areas of a veterinary facility or animal shelter pose different levels of biosecurity risk. Consider using color codes to designate different areas.
For example:
Hang a colored tag on a kennel where an animal with an infectious disease stayed; indicating a more stringent cleaning and disinfection process.
- Limit the movement of equipment and personnel from different biosecurity level areas.
- Communicate changes in health status of an animal so that you adapt your infection prevention strategies accordingly.
- Identify and designate levels of biosecurity risk based on the different areas of your facility.
Level 1
Level 2
Level 3
STEP 3
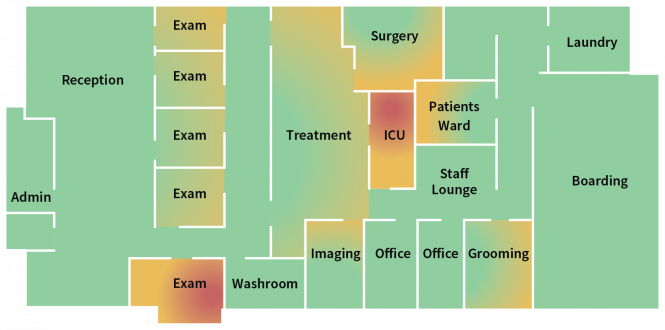
Account for the mode of transmission for possible pathogens
When an infectious pathogen enters your facility, you must break the infection cycle through cleaning and disinfection.
- Remove fecal matter and other bodily fluids or soils.
- Clean and disinfect all surfaces with Rescue™ working from the cleanest area toward the dirtiest area to lessen the risk of contaminating surfaces as you work.

Transmission Precautions
Swipe left or right to scroll table
| Precautions | Pathogen | Transmission Precautions |
|---|---|---|
| Airborne | Mycobacterium tuberculosis Yersinia pestis Francisella tularensis |
Isolation, ideally negative pressure room Wear N95 respirator mask Barrier nursing |
| Droplet | Canine infectious respiratory
disease complex Infectious feline upper respiratory tract disease |
Isolation Space animals four feet apart or more Barrier nursing |
| Contact | Multi-drug resistant bacteria Dermatophytes Leptospira spp Salmonella spp Parvovirus |
Warning signage on the cage Barrier nursing Dedicated equipment Isolation for certain pathogens Limit movement of affected animals Hand hygiene precautions Proper cleaning, disinfection and disposal |
STEP 4
Choose the right disinfectant
Your team will need to determine your disinfectant needs:
1. Will you use one product for cleaning and another product for disinfecting?
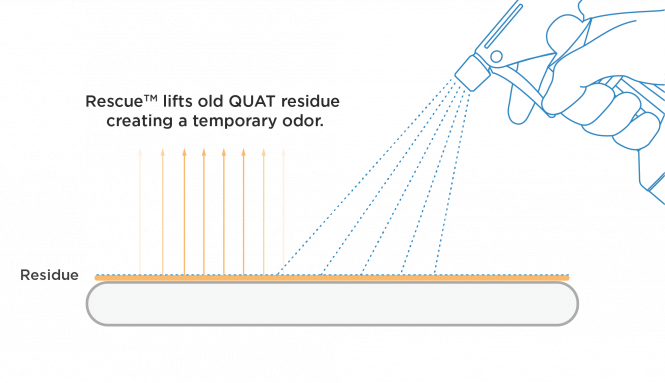
There are different products and processes, and some disinfectants only work after the surface is already visibly clean, some disinfectants are inactivated when they come in contact with organic matter. Choosing a disinfectant that does not have this limitation will improve your infection prevention program. Cleaners are not necessarily disinfectants and disinfectants are not necessarily cleaners. However, one-step cleaner disinfectants do exist.
Rescue™ is an all-in-one cleaner and disinfectant.
2. Will you use one disinfectant for daily use, then switch to another in cases of serious infectious issues? Or will you use something that’s more protective all the time?
For example, practices that see a lot of emergencies likely need a disinfectant with a broader spectrum of kill than a more wellness-focused practice that primarily does check-ups, vaccinations, and routine surgeries. Some products offer multiple dilutions to meet the needs of different facilities.
Rescue™ comes in a variety of formats including a concentrate that allows practices to dilute as necessary for different levels of risk.
3. What formats of the chosen disinfectant will you use?
Rescue™ comes in ready-to-use wipes, ready-to-use solution and concentrate (allowing you to control the final dilution).
REMEMBER
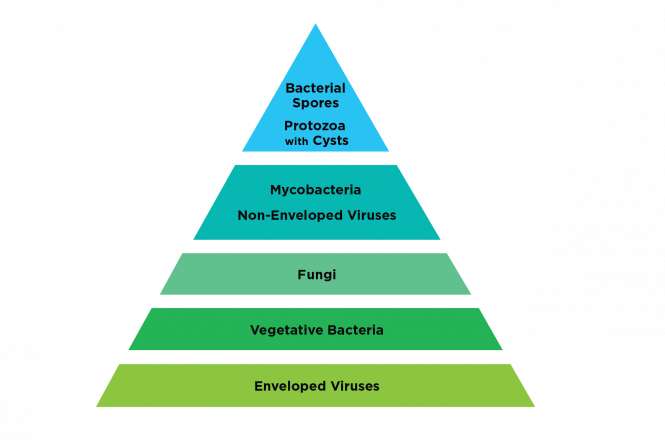
When choosing a disinfectant it is important to keep in mind the Hierarchy of Susceptibility. The principal is that if a disinfectant kills a gold standard pathogen in a category, it will also be effective against other pathogens in that category. Instead of looking at total numbers of pathogen claims, ask if your disinfectant of choice kills the gold standard of pathogens in the category you are trying to disinfect for.
HIERARCHY OF SUSCEPTIBILITY
STEP 5
Train your entire staff
This site has everything you need to start using Rescue™ formulations for your cleaning and disinfecting needs.
- Review the content and watch the videos.
- Download the Quick Start Guides and make them easily accessible for everyone.
- For additional team training visit our learning website.
The most important thing is to have a system that works for your facility.
- Define your daily needs and make sure your staff understands the protocol.
- Define an outbreak. Have a protocol for dealing with higher risk exposure.
By having clear definitions for everyday use and outbreaks, you will save money by using the appropriate amount of product.
In particular, when using Rescue™ Concentrate, using the everyday dilution of 1:64 or 2 oz per gallon will save money and avoid sticky floors that may result from using highly concentrated dilutions.
STEP 6
Make the disinfectant and Quick Start Guides readily accessible
Even staff members with the best training and intentions may do things their own way or fall back into old habits.
- Set up enough cleaning and disinfecting stations in your facility to reduce the amount of moving around to lower the chance of accidentally contaminating other areas.
- Stock each station with product and related accessories and tools including copies of the Quick Start Guides.

Quick Start Guides:
STEP 7
Set up routine quality-control measures
-
Mark expiration dates on Ready to Use™ products, as well as, all diluted and non diluted concentrates. Clearly mark your diluted concentrate with a work place label.
- Maintain cleaning and disinfecting logs for staff to make notes about what they’ve cleaned and the date and time.
- Review and revise your cleaning protocol program to continually improve your cleaning and disinfection program.